You’re offline. This is a read only version of the page.


This article illustrates the ways you can use Folders and Labels (or Comments from our handheld testers) to organize and search for test results in Link-Live.
You can now view video demonstrations of the Link-Live features described in this article. Open the left-side menu in Link-Live, and select Support > Video Tutorials.
Organizing Features
FOLDERS: Create folders that organize test results by site, job, person, or any other characteristic.
LABELS: Add multiple labels that allow you to provide more specific details to a test or group of tests. Add Labels in Link-Live or upload Comments with your test results from your handheld tester.
IMAGES: Attach pictures to test results and document physical characteristics, like an asset tag, a photo of the access point you just installed, or the office/location that you are in.
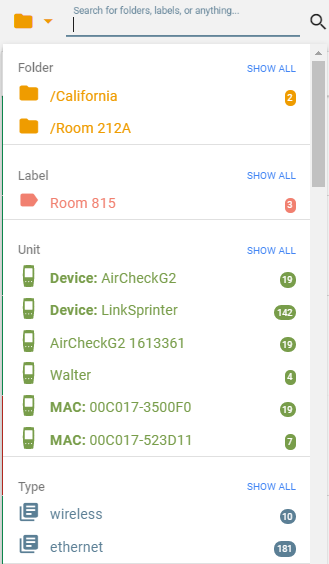
SEARCH: Use the search feature to search your data for folders, labels, unit, mac address, date, or just about anything that is saved.
The Interface
Folder and label options are shown above the detailed test cards for any single, selected test result.
Assigned folders and labels are shown in the test results list for each result.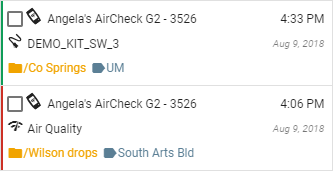
On the Link-Live Results page, check-boxes next to each uploaded test result allow you to select one or multiple test results. 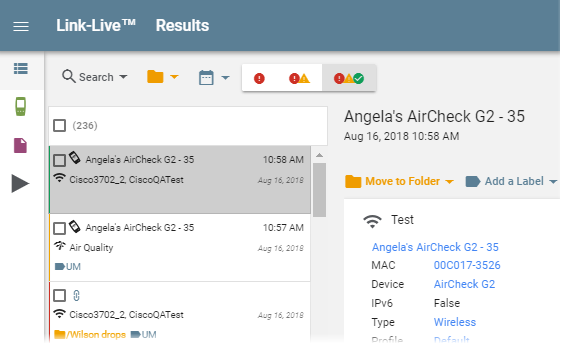
Once you check a box to make a selection, you'll notice a new bar appears at the very top of the page allowing you to move multiple results to a folder, add or remove a label, or delete the selected test results by opening the overflow menu at the right.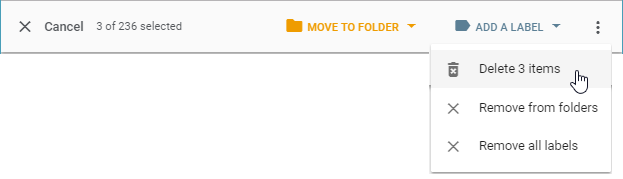
About Folders
Select Move to Folder with any test result(s) selected to file the result into an existing folder or to type in a new name to create a new folder.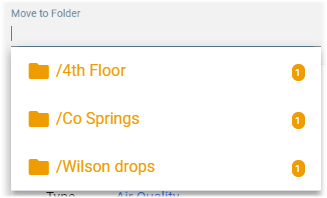
Note that when you access a folder, you can see what folder you are in by looking to the right of the option to CLEAR. If you want to go back to see all results, click CLEAR to remove all filters or you can click the X next to the folder name.
How to unfile results from a folder:
1. Select the checkbox for the test result(s) that you would like to unfile.
2. Click MOVE TO FOLDER in the top menu.
3. From the pop-up box, click REMOVE FROM FOLDERS.
Note: In order to delete a folder, the folder must be empty; otherwise, you will not see the delete option when you hover over the folder name.
About Labels
You can add or remove a label or comment to your test results. Depending on how you add these labels, they can be automatically filed into a specific folder. There are a few ways to add a label to an existing result:
1. From within the Link-Live interface, select a result, then ADD A LABEL. Select an existing label from the drop-down menu, or type in a new one and add it to the selected result.
2. Reply to the email test notification with notes/comments that you would like to add. If you are adding multiple labels, separate by a comma, for example:
Label 1, Label 2
Room 212, Port 3A
3. Upload a Comment from your handheld tester, attached to your latest test result or other uploaded files.
Automatic Folder Filing
There are two ways to auto-file your test results:
Handheld Tester Interface: On your tester interface (or Mobile UI), you can add notes/comments about the test. Start the comment with a "/" followed by the folder name (the folder can be new or existing). When the result posts to the cloud, it will automatically be filed into the specified folder.
Test Result Email: From the test result email, reply with a "/" followed by the folder name (the folder can be new or existing). The result will automatically be filed into the specified folder. Additionally, you can specify a label. Keep in mind there can only be one folder or one label per email. Multiple entries will need multiple replies. Both examples shown below:
Folder Example:
Label Example:
In the example above, the test result would be filed into the folder Chicago with two labels, Room 212 and Port 3A.
How to remove labels:
Do one of the following:
With the test result(s) selected, click Add a Label from the upper right side, and from the pop-up box select Remove ALL LABELS (as shown below):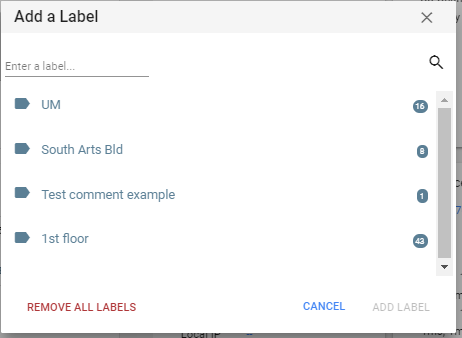
or
With the test result(s) selected, press the overflow buttons  from the upper right side, and from the pop up box, click Remove all Labels.
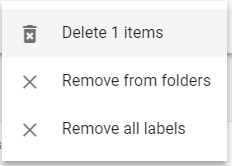
About Images
You can include an image in your test result a couple of different ways:
1. Reply to the test results email with your image attached.
2. Upload the image to the test result within Link-Live. From within Link-Live, click the test result select it and scroll to Attachments. You can either drag a file or click to add an image.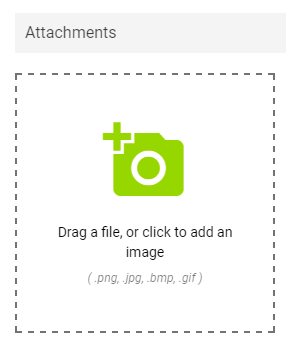
About Searching
Click into the search box, and you'll be given a drop down menu with options to search by folder, label, unit, type, POE, speed, IP address, etc. If the information posts to Link-Live, then it is searchable. Keep in mind, to the right of the CLEAR option, you will see the filters you have selected. Click clear to return to all results, or click the X next to a filter you would like to remove.